Connecting a Distance Sensor to Your Robot Car

This is an older post from when this site covered general embedded learning. The site now focuses on modernising classic vehicles.
Note
This tutorial is based on my Bluetooth Arduino car. You can read about it here. So, if your car is different, be aware the connections and code might need to be adapted for your project.
Required Components
- Arduino Uno
- HC-SR04 Ultrasonic Sonar Distance Sensor
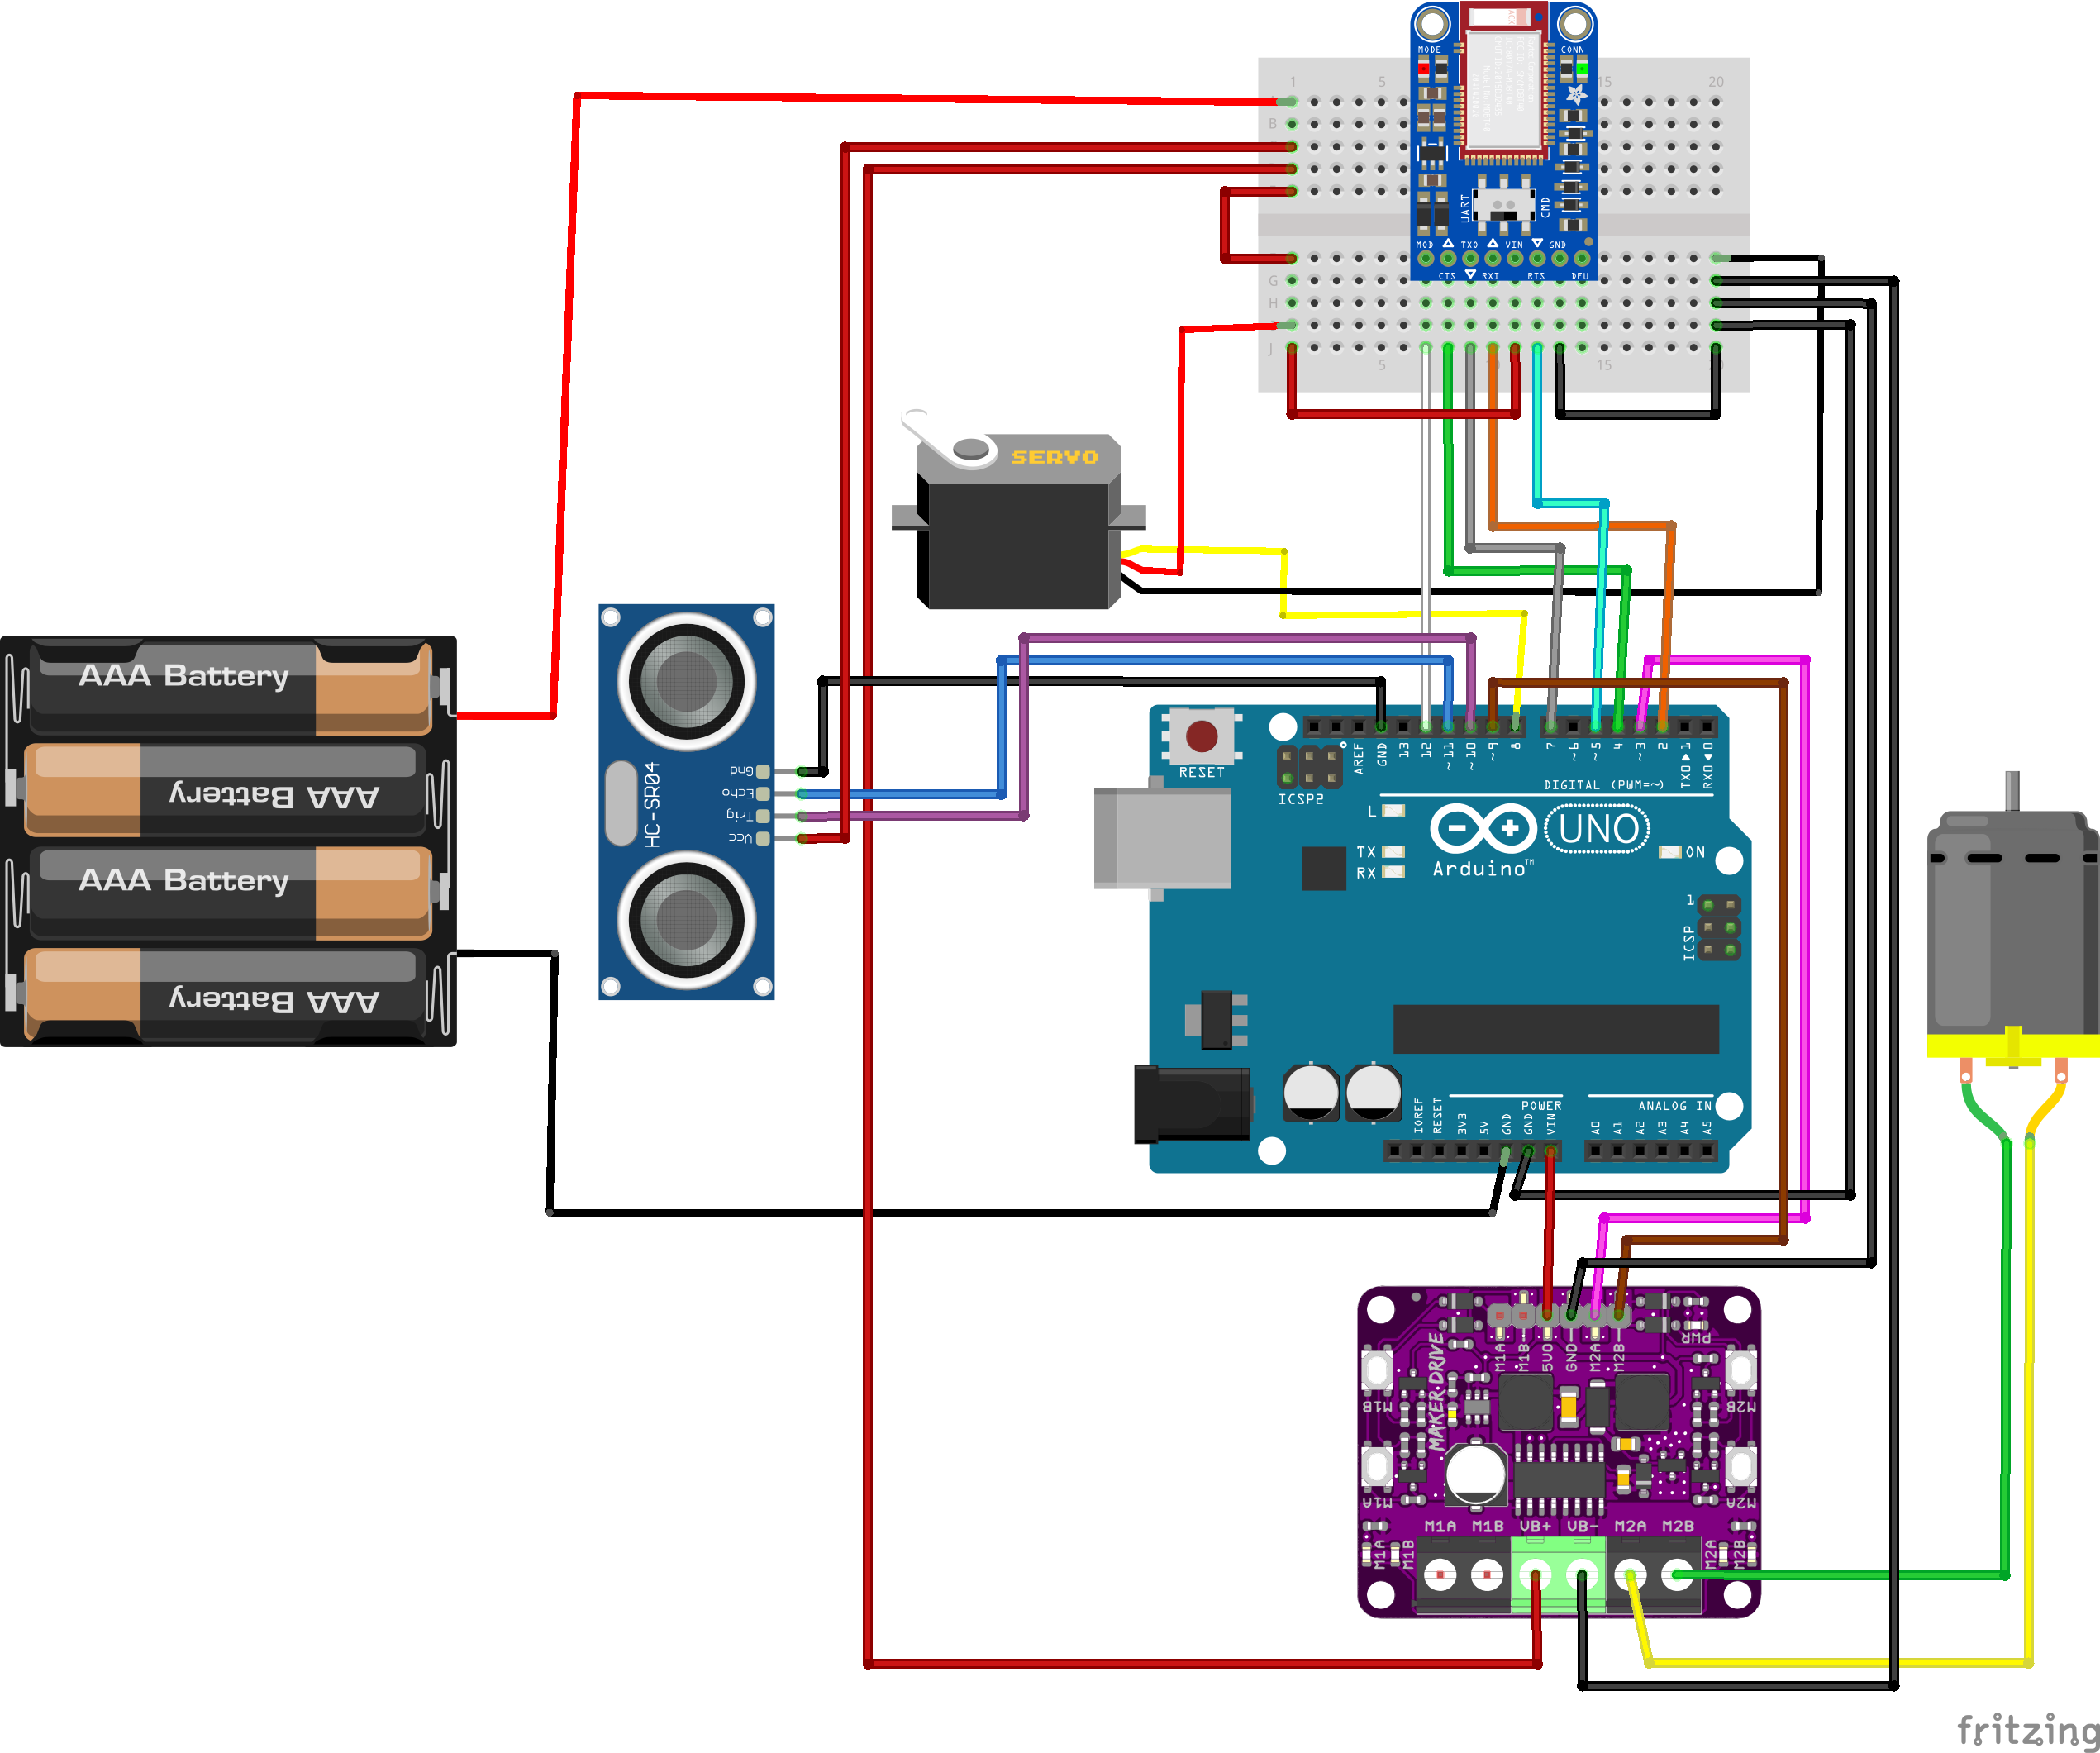
Circuit Diagram
Code
You can see the code below if you want to test the sensor with only the Arduino Uno.
However, you can also see my completed code on GitHub.
// DISTANCE SENSOR SETTINGS
#define TRIG_PIN  10 // Connect Arduino pin D10 to HC-SR04 pin Trig
#define ECHO_PIN  11 // Connect Arduino pin D11 to HC-SR04 pin Echo

// Distance sensor Variables
long duration;    // Sound wave travel duration
int distance;     // Distance measurement

void setup() {
  Serial.begin(9600);
  Serial.println("Initialising Arduino with Ultrasonic Sensor HC-SR04");

  pinMode(TRIG_PIN, OUTPUT);
  pinMode(ECHO_PIN, INPUT);
}

void loop() {
  // Clears the TRIG_PIN condition
  digitalWrite(TRIG_PIN, LOW);
  delayMicroseconds(2);

   // Sets TRIG_PIN HIGH (ACTIVE) for 10 microseconds and then LOW (INACTIVE)
  digitalWrite(TRIG_PIN, HIGH);
  delayMicroseconds(10);
  digitalWrite(TRIG_PIN, LOW);

  // Reads the ECHO_PIN, returns the sound wave travel time in microseconds
  duration = pulseIn(ECHO_PIN, HIGH);

  // Calculating the distance
  distance = duration * 0.034 / 2; // Speed of sound wave divided by 2 (go   and back)

  // Displays the distance on the Serial Monitor
  Serial.print("Distance: ");
  Serial.print(distance);
  Serial.println(" cm");
}
I recommend this article if you want to better understand the code's logic.
Connecting it to the Arduino
This step is pretty straightforward. In my case, this was how I connected it:
| HC-SR04 | Arduino | Comments |
|---|---|---|
| Vcc | 5V | You can also connect this to the power source if you have one |
| Gnd | GND | Or just any common ground |
| Trig | 10 | You should be able to use any available digital pin on the Arduino |
| Echo | 11 | You should be able to use any available digital pin on the Arduino |
So, yeah, that was simple. Remember to make adjustments depending on your setup and the pins available. Now, let’s check on the code changes we need to make.
Updating the Code
The first thing to do is to add the pin settings in the BluefruitConfig.h file:
// DISTANCE SENSOR SETTINGS
#define TRIG_PIN  10 // Connect Arduino pin D10 to HC-SR04 pin Trig
#define ECHO_PIN  11 // Connect Arduino pin D11 to HC-SR04 pin Echo
We add the variables we need:
// Distance sensor variables
long duration;  // Sound wave travel duration
int distance;   // Distance measurement
bool isBacking; // Detect if the car is backing
Make sure everything is set up correctly in the void setup() method:
void setup() {
  // ... some code ...

  isBacking = false;
  pinMode(TRIG_PIN, OUTPUT);
  pinMode(ECHO_PIN, INPUT);
}
Now, since all the configuration is in place, we can start playing with the fun bit.
I added the retrieving and calculation of the distance to the top of the loop:
void loop() {
  // Clears the TRIG_PIN condition
  digitalWrite(TRIG_PIN, LOW);
  delayMicroseconds(2);

  // Sets TRIG_PIN HIGH (ACTIVE) for 10 microseconds and then LOW             (INACTIVE)
  digitalWrite(TRIG_PIN, HIGH);
  delayMicroseconds(10);
  digitalWrite(TRIG_PIN, LOW);

  // Reads the ECHO_PIN, returns the sound wave travel time in microseconds
  duration = pulseIn(ECHO_PIN, HIGH);

  // Calculating the distance
  distance = duration * 0.034 / 2; // Speed of sound wave divided by 2 (go   and back)

  // Displays the distance on the Serial Monitor
  Serial.print("Distance: ");
  Serial.print(distance);
  Serial.println(" cm");

  // ... more code
}
And just below that, I've added a condition to check if the car has detected something within 50 cm and is not moving backwards.
 void loop() {
    // Code to retrieve and calculate distance

    if (distance < 50 && isBacking == false) {
    	robotStop();
    }

    // ... more code
}
Since I'm able to observe whether a button was pressed or released, I can use that to help me figure out if the car is going backwards or not.
// Buttons
if (packetbuffer[1] == 'B') {
    uint8_t buttnum = packetbuffer[2] - '0';
    boolean pressed = packetbuffer[3] - '0';
    Serial.print ("Button "); Serial.print(buttnum);
    if (pressed) {
        Serial.println(" pressed");
        if (buttnum == 7) {
        	servoSteering.write(45);
        }
        if (buttnum == 8) {
        	servoSteering.write(125);
        }
        if (buttnum == 5) {
        	robotForward();
        }
        if (buttnum == 6) {
        	isBacking = true;
        	robotReverse();
        }
    } else {
        Serial.println(" released");
        if (buttnum == 7 || buttnum == 8) {
        	servoSteering.write(DEFAULT_ANGLE);
        }

        if (buttnum == 5 || buttnum == 6) {
        	isBacking = false;
        	robotStop();
        }
    }
}
Result
Distance sensor doing its job, preventing the car from crashing. But as you can see, the car doesn't always behave as it should.
My hunch is that it has something to do with the motor driver taking too much current, causing it to be a bit unstable.
So, my next move is to change that out.
Distance sensor doing its job, preventing a crash
Thank you for reading!


Comments ()